Showing posts with label Card Making. Show all posts

Jun 10, 2012

Great Classes from Els of Elizabeth Craft Designs!

Our group of happy participants!

Last Thursday at Scrapbook Connection in Warrenton, Oregon brought us the unusual and much anticipated pleasure of two fantastic classes with Els Van de Burgt of Elizabeth Craft Designs.  We don't often have the opportunity to have world class designers visit our coastal community and this was a real treat.

Two classes at two hours each were jam packed with technique and product and we were like sponges, taking in everything as quickly as possible.  It was an afternoon and evening well spent.  I think the last sentence is a huge understatement!


Maggie, the product rep with Els


Els demonstrating to the class.


Hard at work.


Janet breezed through and seemed to be having a great time, yes Janet?


Helen "Tootsie" Bagley Rund of Paper Bagley gets new ideas from the classes.  This lady takes the basics and goes off in creative directions most of us are envious of!


  My personal thanks to Els for coming to our "remote outpost" on the Oregon Coast, we appreciate your effort more than you know.  You are welcome back anytime!


Dec 11, 2011

Alcohol - Pens That Is! Really?


Take a few very creative women, add great surroundings, lots of paper crafting supplies and tools, a generous supply of Copic and Marvy alcohol pens, shake and serve for a weekend of fun and productivity!
That's what happened this weekend at Scrapbook Connection's event house in Warrenton, Oregon.

We focused on the Marvy and Copic lines of alcohol pens and the voluminous information offered to produce some really fantastic focal images for paper crafting projects.  After getting a little practice under everyone's belt, we moved on to combining Elizabeth Crafts Designs and Glitter Ritz products using alcohol pen techniques for detailing.  The result was extremely gratifying and oh by the way. . . we had a great time!


Becky and Terry showing off their first practice image.


Paula deciding a real cup of hot chocolate might be next!


Jeannette Hayward, owner of  Scrapbook Connection

Here are a few works in progress:


We started at 10 a.m. Saturday, held class, had a great dinner in the well equipped kitchen, worked and played until 2 a.m., then fell, pleasantly tired into comfy beds all ready and waiting for us.  I should say, I was in bed by by 2, I heard this morning at breakfast that the fun went on until 4a.m.!  When people start creating with no distractions and great people to talk to and share with, it's difficult to stop!


With breakfast over it was back to the work tables, and me?  I headed home to attack the laundry and take a nap!


By the Way:  You can now find me at my Etsy Store: Crane Island Comforts and on Facebook!
And don't forget to follow me here!
Until next time, enjoy life.

Pin It


Mar 7, 2011

Weeds Are Growing Like Crazy


As promised, here is card number two in the series made as sets for Christmas gifts.

This was an engrossing card because I had no idea what I was going to do until it took shape during the creative process.  That's always fun but I  don't know why it also makes me nervous!?!  I mean, it's only paper, which I have a ton of, and embellishments, powders and ribbons, which I also have a ton of, so what's the big deal?  Somewhat the same feeling you get gazing at a blank sheet of watercolor paper and being afraid to apply the first color.  It's an art thing, what can I say.  Total neurosis, I digress.

O.k., this is my study in raspberry and tan.  Don't blame me, Colormates says its raspberry and who am I to argue?  Every once in awhile it's fun to do something unexpected and for me, throwing tan in with just about anything looks unexpected even though I usually like the results after the fact.  What you're looking at here is a Colormates Medium Racy Raspberry base with a craft brown mat from my stash so I can't give you a manufacturer on that one.  It's embossed with the ever favorite Cuttlebug Swiss Dots embossing folder leaving a l" blank area in the bottom half of the mat.  This is where I was intending to emboss a greeting but decided to change my approach in mid-stream.  Go figure.

Next up, here comes the Medium Racy Raspberry again, using Spellbinders Fair Isle Pendant die studded with jewels in the four corners.  On top of that I applied ribbon from Joann's and one of the treatments it always tickles me to use which is finding ribbon that matches one of my stamps!  See the Poppy Boxed Set post http://craneislandcomforts.blogspot.com/2010/02/poppy-boxed-set.html and you'll find a card that illustrates this same treatment.  Thank you Joann's for cooperating with my desires, that's very sweet!

The focal point is a Spellbinders Large Classic Oval using the #4 die and craft  brown paper, also embossing with the same die.  The stamp is Stampendous "Weeds" (hence the title of this post, sorry) embossed using Versamark ink and fine white detailing powder.  Here's my take on white embossing powder.  After holding up numerous brands side by side in the jars, white is not always white.  Most of what I've seen is actually off-white and while this might seem like nit picking, when you've spent all of this time and sweat, yes sweat, on a card and the white embossing looks as if the bleach got left out of the wash, well, you get the picture.  The whitest white embossing powder I've ever been able to find is from "The Peddler's Pack" in Beaverton, Oregon.  They must buy in bulk and repackage it in their own containers but honest, it is WHITE.  They have a web site and the owner, Joyce, is always happy to answer any questions, she's is a real delight to speak with on the phone.  Remember the beautiful witch in The Wizard of Oz?  That's what she sounds like, honest!  Love you Joyce. . . .

So, all of this is finished off with three little itty, bitty pearls  centered under the oval.  I've used water-marked bond paper to line the inside of the card but didn't include a picture since who wants to look at white paper anyway?  Hey, not me, I'm still o-zoning on the blank white watercolor paper!  Can anyone recommend a good therapist?

Thanks for visiting, oh, and putting up with me!

Feb 27, 2011

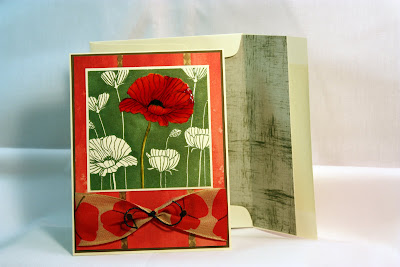
Poppies, Poppies, Poppies


I'll be posting a series of cards I made as Christmas gifts for family this last holiday season.  The cards were combined as a set of twelve in a very simple, upholstered box constructed for the dimensions of the twelve cards.  The color scheme for each box was chosen with the particular individual in mind.
Initially, I was designing a totally different box, much more complex, but after two months and 96 cards later. . . I revised my plan!

I'll be posting photos of the boxes at the end of this series to give you an idea of how choices in cardstock and pattern can make such a dramatic difference.

I'll also be posting the recipes for the cards as I go but of course, couldn't find my notes for this first one, poppies.  Hope you enjoy anyway and keep checking back. . .or. . .better yet, "follow me" on my blog! 

Apr 17, 2010

Split Negative Technique


This card was inspired by a StampTV tutorial posted a few months ago.  I wanted to take it a step further by splitting the background and was pleased with the effect. To take a closer look just click on the image.

Feb 28, 2010

Poppy Boxed Set

Did I mention before I've become hooked on making these boxed sets? Well that hasn't changed!  I completed another last week and here it is.  Hope you're not tired of looking at these because I'm sure there will be a few more.  Here goes!


Outside of box with lid on. 
Sorry, I have a huge need to state the obvious.
I'm working on it though.


I'll bet you can't guess what this is. Yep, you got it.
Inside of box with lid off.
I said I was working on it.

A couple of things seriously. . . The set of six cards in the rear section of the box are the largest (I thought that was fitting) and are standard A2.
The mid-size cards at front left measure 3 1/4" x 3 3/4" and the little cards at the right front are business size note cards.

The transparent pocket on the front flap contains envelope seals on sticker paper so they're self adhesive and match the set.  These are an optional use item as all three envelopes are self-adhesive.

Here are detail pictures of each:


The A2 card has a top fold and the envelope is purchased then lined to match the set.


A little closer view.


Mid-sized card with hand-made envelope.


The little, business sized card with hand-made envelope.


There are some things to note.  The business size note card was embellished with heavy weight patterned paper using a Martha Steward border punch.  While I love Martha's punches they are not up to the task on heavy papers and card stock on the highly detailed punches.  In this case since I used paper with a white back and core, I was left with very "furry" openings which required sanding with very little tools and my craft knife to take out boulder (just kidding) sized pieces.  I quickly grew tired of this process and became less picky. Click on the image and you can really see, yuk!  This is not, I repeat not, a combination I would use again.

Also, since I used darker cardstock with the exception of the A2 card, I've lined all three sizes of cards with a nice watermark bond typing paper with a nice finish.

So, there you have it.  Any questions?  Don't hesitate to drop me an email and I'll get back to you promptly.


Jan 11, 2010

The Reveal

Currently I'm obsessed with making card sets, a total of three sizes in a set, all enclosed in a box to match.  I'm having tons of fun with these, afterall, isn't that the point?  A favored few got them for Christmas presents and I'm still not tired of making them!  So here's a few, enjoy!


The largest cards have envelopes which are lined with the black on white design paper.

And Another!


Just a note:  The area in the front middle of the front flap is a transparency pocket with punches mounted on sticker paper to be used as decorative closures on the back of envelopes.


And the last design!


Jun 15, 2007

GREETING CARD GALLERY - PAGE SEVEN

Siberian Iris / Water Color Technique #2500004

Red Flower / Water Color Technique #2500003


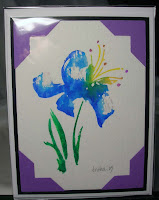
Blue Flower / Water Color Technique #2500004

Small Scottish Thistle Thank You / Water Color Technique #2500001

Click On Image To Enlarge

Please Go On To Page Six Of Greeting Card Gallery


GREETING CARD GALLERY - PAGE SIX

Pear Squared Water Color Technique # 2500011

Reverse Flower Over Stamp #2500009

Double Pear Chalk Technique #2500007

Scottish Thistle Water Color Technique / Water Color Paper #2500006

Japanese Lady #2500005

Click On Image To Enlarge

Please Go On To Page Five Of Greeting Card Gallery


GREETING CARD GALLERY - PAGE FIVE

Dimensional Travel / Paper Pieced #4000010

Art Glitter Flower On Transparency #3000016

Put On Your Big Girls Panties....#2500023

Sassy #2500019

Create Water Color On Water Color Paper #2500012

Click On Image To Enlarge

Please Go On To Page Four Of Greeting Card Gallery

GREETING CARD GALLERY - PAGE FOUR

Art Glitter Hydrangea On Transparency # 4000021

Art Glitter Butterfly On Transparency #4000014

Art Glitter Dragon Fly On Transparency #4000013-2

Art Glitter Dragon Fly on Transparency/Bronze #4000013-1

Hand Painted Cherry Blossoms /Water Color Paper #3000024

Click On Image To Enlarge

Please Go On To Page Three Of Greeting Card Gallery

Powered By Blogger

Recent News

Translate

Search This Blog