Showing posts with label Dots N Doodles. Show all posts

May 15, 2016

Spotlight on Artist Mica Still


Napier, New Zealand

Mica Still, a fabulous artist currently living in  New Zealand, is known for her outdoor street art and she works BIG! Formerly a resident of Astoria, Oregon, Mica (known as Michelle locally), is the daughter of Nickie Piippo.  Nickie is the past owner for many years of Paper Moon, a local paper arts store. So as one might see from the images above and below, artistic talent runs in the family.

The wall in the picture above  depicts the current crisis of the oceans'  inhabitants becoming entangled in abandoned fishing nets  and other debris which usually leads to death.  Mica was among a select group of artists invited to participate in this world wide awareness project with this focus displayed in Napier, New Zealand.


This piece was completed on a wall in Auckland, New Zealand.  I apologize for the quality of the photo but you can really get the size and scale of Mica's artwork.


While Mica was here in Astoria for the holidays a few months ago, she was asked to create a mural on a truck owned by her uncle's construction company. It was my great pleasure to be able to see Mica at work.  With her only tool being artist quality spray paints she purchased locally from Dots n' Doodles Art Supply, Mica set to work on a very cold winter day.  And...


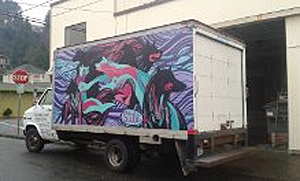
this is the result of her efforts!

We are amazed with  Mica (Michelle) and her body of work done on an international scale. She's one Astoria can be proud of!

Apr 19, 2016

Robin's Heart


Robin's Heart was a project of love for my sister Robin.  Hearts are one of her favorites and the feather represents our mother who passed away several years ago.  Please excuse the background shine, I neglected to take a final photo before I had the piece matted and shrink wrapped in preparation for shipping.

I'd like to share the process of how this came together for those who are interested.


The tangle I used to morph into a heart is "Grace" by Helena. It's a tricky little beast!  All I can say about the pattern is to tackle two or three hearts in the chain at a time to achieve the 3-D effect.  I started this one twice to get it right. I used a Micron .01 to draw the hearts after first drawing a penciled in heart shape first.


This photo shows the pattern completed with color, shading and highlights added. I used my favorite colored pencils, Caran d'Ache Luminance colored pencils.  They really take the color layers beautifully without a waxy bloom.  Seven colors were used so achieve the dominant color and shading.  You can see the feather design sketched in the middle getting ready to add color.


Feather has been added and now we're ready for the background!


Concentration! The tangle pattern used for the background is "Y-Ful Power" by Soshi. Click on this link for the step-out.  The pattern is started with an offset grid drawn in pencil.  If you look at the step-out this will make more sense.  I drew the entire grid in pencil first and then started the pattern, only doing one small section at a time. Again I used a Micron .01 for the pattern lines. Next came the shading, I use a 4B graphite pencil and a paper blending stub for detail.  For the shadow I still went for a 4B but applied a much denser layer of graphite before blending.

So there it is! I'd be happy to answer any questions about this piece or tangled inspired art in general, just leave me a comment and I promise to get back to you.

Thanks for stopping by!

Mar 16, 2014

NATALIE'S GOLDFINCH

NATALIE'S GOLDFINCH
14 X 17"  On Bristol Vellum
Colored Pencil , Ink , Graphite & Gold Leaf


This piece was a request from my daughter for my grand-daughter's birthday in May.  It was also my first experiment on Bristol vellum with colored pencils.  I love working with the Faber Castell Polychromos, layer upon layer of shading and texture.  It's a workout on the hands though!  Micron pens .05 and .01 were used on the ribbon.  The ribbon was a challenge, I actually had about eight hours into this piece before I put it aside and started over from scratch.  The ribbon was just not working and there are a few things I learned in the process that I will put into practice when I include a tangled ribbon in future projects. Helen Williams' e-book available on her blog A Little Lime, was a tremendous help.

All shading outside of the ribbon, "N" and goldfinch was done with 2B, 6B and 8B graphite pencils and a paper stub. One thing I'd like to pass on and which was new to me; when using a blending stub it's good to sand the end frequently so the colored pencil doesn't build up on the end of the stub making blending of the graphite far more difficult.  I couldn't help touching the edge of the colored pencil area as I was adding my shadows and noticed problems as I tried to blend the graphite.

Lastly, I just had to add some gold leaf in a few spots and was very happy with the outcome.  Another word of caution about the gold leaf sizing on paper.  Give it plenty of time to dry!  If you smear it outside of the desired area you get to spend some really anxious moments gently removing it from the paper with an Xacto knife!

Thanks for stopping by!

Jul 14, 2013

Tangled With Color

I've been caught up in Zentangle (a registered trademark) and tangling for the last two months or so and am absolutely enjoying every minute I spend on it.  The world goes away and I love getting lost in the art.

If you're unfamiliar with Zentangle, Google it and you'll be amazed at the sites and blogs devoted to this unique art form.  There's some really beautiful work being made out there.

I decided to start experimenting with color and have started a couple of larger Zentangle inspired pieces which are still works in progress.  I've been using watercolor pencils and Copic markers up 'till now and applying the color and shading to the completed line art.  However, I was inspired by Rosemary Hill, a Certified Zentangle Teacher, to use a different method and the three test pieces are shown below.


This first and the following two pieces are 3 1/2 x 3 1/2 inch square tiles on Tiepolo  paper.
 
I added splotches of Tim Holtz Distress Stain, misted with water and tilted the tile to let the color run where it would until I was satisfied.  A light selective blotting with a paper towel and then drying with a heat tool provided a good start.
I didn't draw a string but let the segments of color determine where I would place the individual patterns and even what choice of patterns I made.


This turned out to be a lot of fun, I'm definitely going to be playing with this more!
 
***************
 
If you live on the north coast or plan on being in the area Saturday, August 3rd, our local art store, Dots N Doodles Art Supply will be hosting Rosemary Hill with two, two hour Zentangle classes, Zetangle1 and Zentangle 2.  It's going to be a full afternoon well worth the time.  The response to the classes had been exceptional and there aren't many spots left so if you're interested, give the site and their blog a look-see and then give them a call or a fast email.
 
Thanks for stopping by!
 
Trisha


Powered By Blogger

Recent News

Translate

Search This Blog